


You want to create a comic story, so you start with an AI anime image generator. Then you need to fix a background, create a few more scenes, add dialogue, and maybe animate one of your illustrations. Suddenly, you’re looking at five different tools, each with its own credits, limitations, or subscription.
But how many of those tools do you actually need?
In this guide, we’ll look at how you can build a free AI anime workflow around PixAI, exploring its image generation, editing, and other creative features, including some paid options, before bringing in external tools.
We’ll look at where other free tools can help put everything together to create a short illustrated anime story without paying for a separate tool at every stage.
Start by choosing one main AI creation platform
Before signing up for another tool, think about what your project actually involves.
For instance, say we want to design a character, generate several scenes, make a few adjustments, and arrange everything into a finished page. Some of those tasks require AI, while others are straightforward editing and layout work.
That’s why I’d start with one platform that can handle most of the creative process. Keeping your main creative work in one place also makes it easier to manage your characters, prompts, and generated images as the project develops.
Once you’ve explored what your primary platform can do, you’ll have a better idea of which additional tools are worth bringing into your free AI anime workflow.
Get more out of PixAI before adding another tool
PixAI has several creative tools beyond basic image generation, so it’s worth exploring what you can do within the platform before adding more apps to your workflow. You can create your initial artwork, make changes to existing images, develop more complex projects, and even experiment with animation.
Most features are available to free users, but others require membership. The idea is to make use of the tools you already have access to and consider upgrading when your project calls for something more advanced.
Create characters and scenes with PixAI’s image generation tools
In a comic story, the first task is usually creating a character and the world they live in. PixAI’s text-to-image generator gives you a starting point for both, and you can use its different anime models and community LoRAs to help you develop a particular look.
You can use the same platform to create character portraits, backgrounds, and illustrations for individual scenes. Keeping these stages together also makes it easier to reuse prompts and experiment with different versions of your artwork.
We’ll put these capabilities to work when we build our comic later. For now, the important thing is that you already have several creative options within your main image generator, before you even get to editing.
Refine your artwork with PixAI’s editing tools
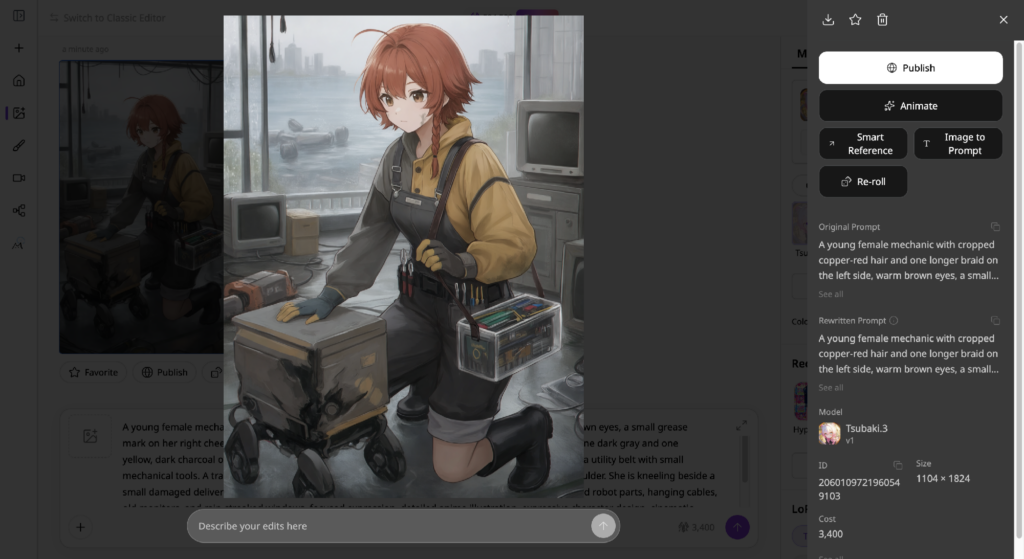
Once you’ve generated your illustrations, you’ll probably find a few details you want to change. Maybe your character’s outfit looks right, but the background doesn’t fit the scene. Or you like the composition but want to adjust the character’s expression.
PixAI offers several ways to work on existing images. With inpainting, you can select a particular area and regenerate it while keeping the rest of the illustration. This is useful for fixing small details, changing clothing, or adjusting elements of a background without recreating the entire image.
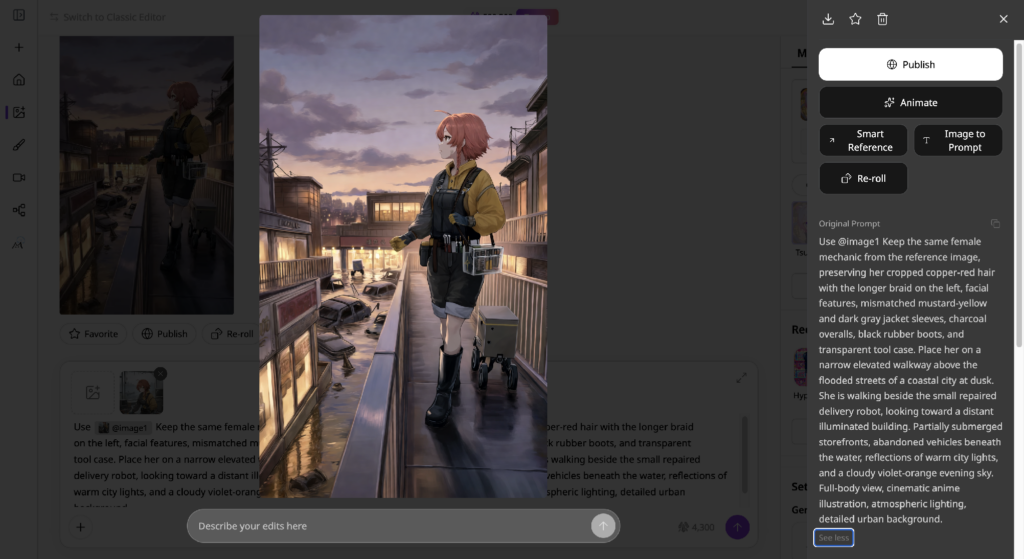
For more substantial changes, PixAI’s Reference Pro lets you use an existing image as a reference and describe the result you want in natural language. You could take your original character illustration and place the character in a different setting or give them a new outfit.
Reference Pro requires membership, but PixAI’s new model, Tsubaki.3, offers a version of the functionality known as Smart Reference. It may not preserve fine details as reliably as Reference Pro, but it makes it quite easy to take a character from one scene and bring them into another without a membership.
Use PixAI Studio for more complex creative projects
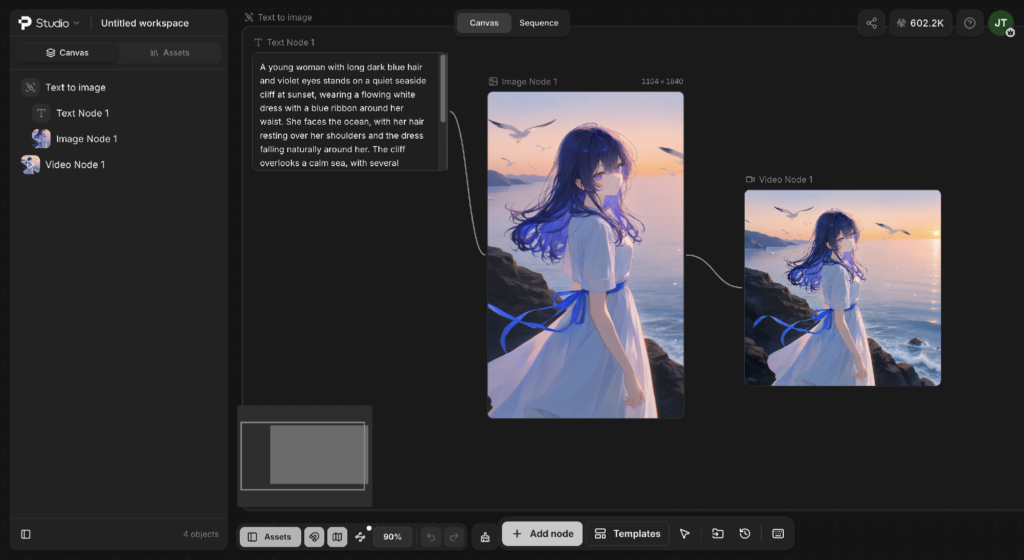
If you’re working on a project with several creative stages, PixAI Studio lets you connect them on a visual canvas even without a membership. It uses nodes to link generation, editing, video, and audio, with the output of one step feeding into the next. You can build your own free AI anime workflow or start with an existing template.
For example, you could start with a character illustration, connect it to an image-editing node to create a new scene, and then feed the finished image into a video-generation node if you want to animate it. You can also reuse existing PixAI artwork instead of starting every project from scratch.
PixAI Studio is particularly useful when you want to explore several creative directions or produce a series of related images and clips. Having the entire process connected on one canvas makes it easier to reuse your work and manage a project that involves more than a few individual illustrations.
Bring your illustrations to life with AI video generation
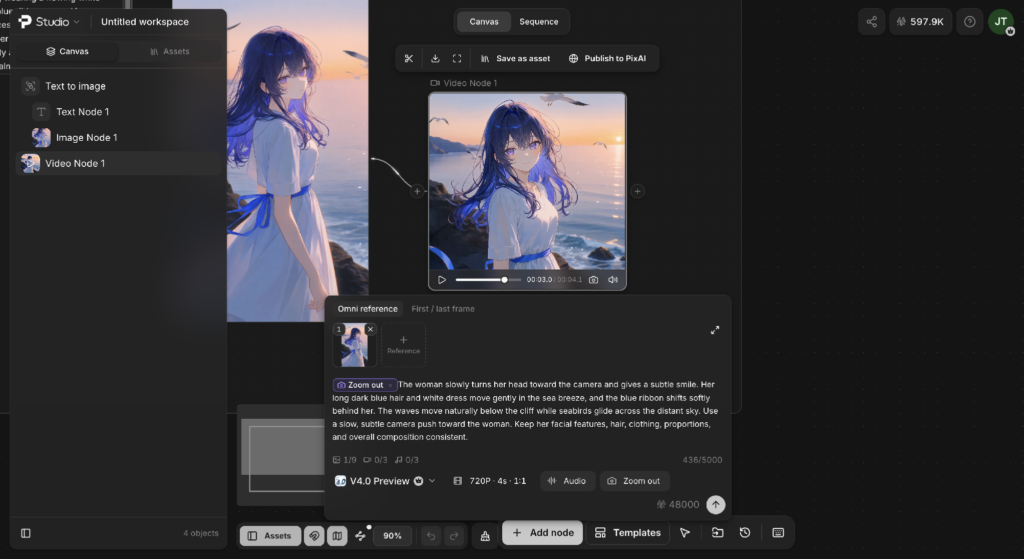
Once you have an illustration you’re happy with, you can use PixAI’s video generation tools to add movement. Its image-to-video feature is particularly useful here because you already have a character, setting, and composition to work with.
Say you have a scene where the main character is standing on a rooftop overlooking the city. You could animate her hair moving in the wind, add movement to the clouds, and introduce a slow camera pan. A short motion prompt can help guide the animation while the original illustration provides the visual starting point.
PixAI also supports text-to-video generation if you’d rather create a clip directly from a written description. Both options require membership, so they’re worth considering if animation is part of your project.
Note that you can use PixAI’s standard interface to generate a video or move to PixAI Studio if you want to create a highly complex or connected scene.
Train your own LoRA for recurring characters and styles
If you’re planning a longer comic or a series featuring the same original character, training a custom LoRA can help you maintain their appearance across different scenes. PixAI lets you do this directly on the platform, so you don’t need a separate training service.
The process starts with a collection of reference images. For a character LoRA, the platform works best with at least 10 clear images showing the character from different angles, with varied expressions and lighting. You then choose a compatible base model, name your LoRA, and add trigger words that identify the character. Once you start training, PixAI handles the process and makes the finished LoRA available for image generation.
Custom LoRA training requires membership, but free users can still use existing community LoRAs during generation. I’d explore those first, especially for a short project. Training your own becomes more useful when you’re regularly creating new artwork featuring the same character or developing a distinctive visual style.
Where do external free tools fit into your workflow?
Even with PixAI handling most of the creative work, there are still tasks where a regular editing or design app makes more sense. You might need to touch up a small detail manually, arrange your illustrations into comic panels, or add sound to an animated scene.
The trick is to choose external tools for specific tasks rather than just adding another paid tool to your workflow. Many of these finishing touches can be handled with free software.
Make manual adjustments to your artwork
PixAI’s editing tools are useful when you want AI to change something in an illustration. But sometimes you already have the image you want and just need to make a few precise adjustments.
For example, you might want to crop a scene, correct its colors, remove a small unwanted detail, or combine elements from two illustrations. A free image editor such as Photopea or GIMP gives you layers, selection tools, and manual controls for this kind of work.
Arrange illustrations and add dialogue
Once you’ve generated your comic scenes, you’ll need to arrange them into a page and add speech bubbles, captions, or other text. This is where a conventional design or layout tool comes in handy.
Free tools such as Canva and Krita can help you organize your illustrations into panels, experiment with page layouts, and add dialogue. You can adjust the spacing between panels, choose suitable fonts, and make sure the text is easy to read.
If it’s a short illustrated story, you probably won’t need specialized comic-making software. Start with a simple page layout and see how your illustrations work together. You can always move to a more advanced tool if you decide to develop the story into a longer series.
Add sound and assemble animated clips
PixAI can generate animated clips, but you may want to combine several of them into a longer sequence. You might also need background music, sound effects, dialogue, or transitions between scenes.
A free video editor such as DaVinci Resolve or Shotcut can handle these finishing tasks. Import your generated clips, arrange them on a timeline, adjust their timing, and add the audio that brings the sequence together.
For example, if you animate three scenes from your comic, you could combine them into a short trailer with music and a few sound effects. This gives you more control over the finished video without needing another paid AI animation service.
When is paying for another tool worth it?
Free tools can cover a surprising amount of your anime creation workflow, especially when you’re using PixAI for generation and editing. But as your projects become more ambitious, you may encounter tasks that require more specialized software.
The important thing is to identify what’s actually slowing you down before adding another subscription.
|
Your project |
When a paid tool might help |
What to try first |
|
A weekly manga or webcomic |
You’re spending hours arranging panels, lettering dialogue, and preparing each chapter. |
Use free layout tools and reusable page templates. |
|
A longer anime animation |
You need advanced timeline editing, audio mixing, effects, or more control over transitions. |
Assemble PixAI-generated clips in a free video editor. |
|
A visual novel |
You’re managing dozens of character expressions, backgrounds, dialogue branches, and interactive scenes. |
Generate assets in PixAI and explore a free visual novel engine. |
|
Artwork for clients |
You need precise revisions, layered source files, or compatibility with a client’s preferred software. |
Check whether a free editor can produce the required deliverables. |
|
Prints and merchandise |
You regularly need professional color management, precise print specifications, or specialized production files. |
Test your existing editor against your printer’s requirements. |
For example, if you’re creating a three-panel comic, a free layout tool may be all you need. If you’re publishing a new chapter every week, dedicated comic software could save you considerable time through specialized lettering and page-management features.
The same applies to animation. You can generate clips in PixAI and assemble them using a free video editor. Additional software becomes worth considering when your projects regularly demand capabilities that your current setup doesn’t provide.
Pay for the specific problem you need to solve. You may find that your existing tools can handle the rest of the workflow perfectly well.
Final thoughts
Building a free AI anime workflow becomes much easier when you make the most of the tools you already have. PixAI can handle several stages of your creative process, from generating characters and editing illustrations to building more involved projects in Studio and experimenting with animation.
For everything else, you can bring in free editors and design tools as needed. Whether you’re assembling a comic, adding dialogue, or preparing an animated short, there’s usually room to finish your project without taking on another subscription.
Start with the project you want to create, explore what PixAI can do, and add other tools when you have a specific use for them. You can always expand your setup as your projects grow.
